![]() This section is valid for all product flavors.
This section is valid for all product flavors.
To connect to the WMS in Geospatial Portal:
A New Data Source window opens where you can select the data source type.
![]() There is no requirement to add the 'http://' prefix at the beginning of the URL. If you forget to add 'http://' at the beginning of the URL, Geospatial Portal will add it automatically.
There is no requirement to add the 'http://' prefix at the beginning of the URL. If you forget to add 'http://' at the beginning of the URL, Geospatial Portal will add it automatically.
![]() The SLD file is an XML file with style definition for particular layers. It overrides the default style, which is set for layers served by a service.
The SLD file is an XML file with style definition for particular layers. It overrides the default style, which is set for layers served by a service.
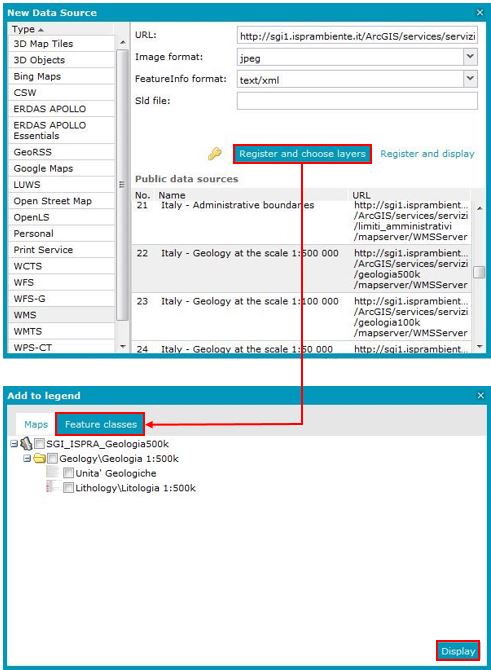
The registered WMS service is automatically displayed on the map, and an appropriate entry appears in the legend.
The service is visible if the following conditions are met:
![]() Parameters such as layers, image format, and property info format are determined by the service and might vary depending on the individual services, even of the same type.
Parameters such as layers, image format, and property info format are determined by the service and might vary depending on the individual services, even of the same type.
You can display other maps or single feature classes and queries using the following commands available on the Data Sources tab:
Display maps ![]() lets you display predefined maps. Click Display maps to open a map window that contains all available, predefined, and ready-to-use maps as currently registered in Geospatial Portal data sources. To display predefined maps, check the box next to the required map and click Display. The map displays in the map window, and an entry is added to the Map Content.
lets you display predefined maps. Click Display maps to open a map window that contains all available, predefined, and ready-to-use maps as currently registered in Geospatial Portal data sources. To display predefined maps, check the box next to the required map and click Display. The map displays in the map window, and an entry is added to the Map Content.
Display feature classes and queries![]() lets you display feature classes and queries from available data sources. Click Display feature classes and queries
lets you display feature classes and queries from available data sources. Click Display feature classes and queries ![]() to open the Feature classes window, where you have access to all available feature classes and queries served by the registered services. To display a feature class and/or query, select an element and click Display. The selected feature classes and queries display in the map window, and an entry appears in the Map Content.
to open the Feature classes window, where you have access to all available feature classes and queries served by the registered services. To display a feature class and/or query, select an element and click Display. The selected feature classes and queries display in the map window, and an entry appears in the Map Content.