Clip-Zip-Ship (CZS) allows you to select a region of data (clip), package it into a zip file (zip), and email a link that enables download of the file to a recipient (ship).
You can download any type of data as long as it is WCS-enabled. The data can be shipped in the following formats:
![]() LAS format is available only for LIDAR datasets.
LAS format is available only for LIDAR datasets.
To initiate Clip-Zip-Ship, you first need to indicate which coverage you want to download by selecting its entries in the Search Results panel. Next, click Add to Clip-Zip-Ship, and the Clip-Zip-Ship tab on the sidebar will be activated.
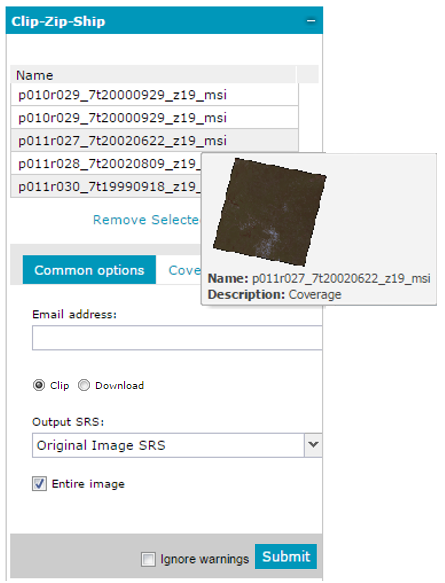
All coverages selected in the Search Result panel will appear automatically in the Coverages fields on the Clip-Zip-Ship tab. You can remove certain coverages that are selected for being clipped, zipped, and shipped from the list by selecting them and clicking Remove Selected. In order to clean the Coverages list, just click Remove All.
When any data is added to the Clip-Zip-Ship coverages list, the service is registered automatically in Data Sources and a layer with the selected data is displayed on the map. When the Send button is clicked in the Clip-Zip-Ship dialog box, the layer is removed from the map automatically while the service remains registered in Geospatial Portal.
When you hover the mouse cursor over an item in the Coverages list, the preview window with the thumbnail, name, and description for the selected item appears. Also, the corresponding footprint on the map (described in the Search Results Panel section) is automatically highlighted. Double clicking on the item in the Coverages list results in the map view zooming to the extent of the selected coverage.
Before zipping and shipping the data, options for Coverages should be defined. The options set on the options tabs are applied to each coverage added to the list. Options are grouped in two tabs: Common options and Coverage options. Some fields in the options group are filled automatically, but you can change them according to your needs.
The parameters set on the Common options tab applies to all present items in the Coverages list. If some parameters on the Coverage options are set for any coverage from the list, then the parameters from the Coverage options tab are used for the Clip-Zip-Ship.
Common options are used to specify the following parameters:
Coverage options are used to specify the following parameters:
Common Options
E-mail address – Provides the email address to which the data will be sent.
Clip and Download radio buttons - Clip option enables controls (described below) on Common options and Coverage options tabs, that are used to perform Cilp-Zip-Ship operation. If Download option is selected only controls for download with filters operation are available (on Common options tab). The Coverage options tab is disabled then.
![]() Clip and Download radio buttons are available in Geospatial Portal in version 16.00.0100 or newer.
Clip and Download radio buttons are available in Geospatial Portal in version 16.00.0100 or newer.
Output SRS – The SRS to which the downloaded data will be re-projected. This is a global setting for all coverages and will be used only in case the option Use common option (default) is selected for the Output SRS field on the Coverages options tab.
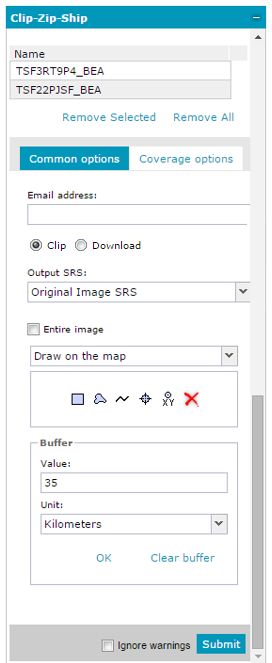
Entire image – If this option is selected, the entire selected image(s) will be processed. Unchecking Entire image allows you to define the spatial extent or to specify the part of the image for selected coverages marked for download.
The spatial extent can be defined with one of three available methods (selectable from the drop-down list):
Additionally, buffer for methods Draw on the map and Select feature from the map can be set. When defining a buffer, two parameters must be provided: buffer unit, which is selected from the Unit drop-down list, and buffer value, which is set in the Value field. If you have selected the point geometry type for drawing the CZS geometry, you may choose to define either a Circle or Square buffer around the selected point. The Value field defines a radius for a circle buffer or a width/height value for a square buffer, For example, a buffer value of 2km for a selected point location will result in either a 4km diameter circle or a 2x2km square, depending on the buffer type selected. Having provided those two parameters, click OK (in the buffer option group) to apply settings for the defined buffer. The Clear buffer button removes the defined buffer from the map. The buffer cannot be applied when the Only in visible map area option is selected.
![]() Methods Only in visible map area, Draw on the map and Select feature from the map are also applicable for download with filter option and can be selected from the Filter Geometry field.
Methods Only in visible map area, Draw on the map and Select feature from the map are also applicable for download with filter option and can be selected from the Filter Geometry field.
Coverage Options
![]() Coverage options only apply to the selected input coverage. If you are working with multiple input coverages you will need to verify the options for each one individually.
Coverage options only apply to the selected input coverage. If you are working with multiple input coverages you will need to verify the options for each one individually.
Output SRS – The SRS to which the downloaded data will be re-projected. You can choose from SRS identifiers available in the drop-down list. You can also define a different SRS for each selected coverage item, or you can select the Use common option. When the Use common option is selected, the SRS chosen in the Geometry field on the Common options sub tab will be used.
Output format – The data can be shipped in the following formats:
If requested data is not already in one of these formats, the application converts it.
![]() LAS format is available only for LIDAR datasets.
LAS format is available only for LIDAR datasets.
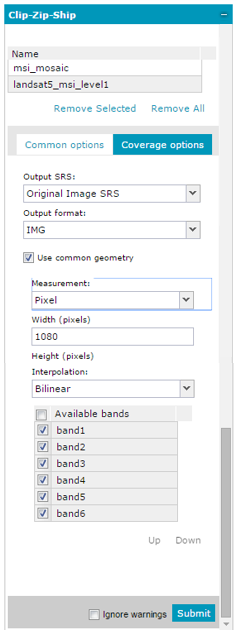
Measurement – Indicates the measurement types which specify if and how the coverages will be resampled before shipping. If Measurements is set to Resolution, you must provide the values for the Resolution and Resolution unit fields.
If Measurement is set to Pixel, the Width (pixels) and Height (pixels) fields are activated where the image size is defined.
Interpolation – ERDAS APOLLO assigns calculated values to certain pixels in shipped images in order to make those images appear smoother. This option allows you to select how ERDAS APOLLO calculates those values. ERDAS APOLLO provides the following interpolation methods, although the ones that are currently available to you will depend on the format of the source image you are downloading:
Available bands – Specifies the bands of the source coverage that will be included in the shipped coverage. For example, if you have 4 bands in an image and if in the Clip-Zip-Ship request only 2 bands are specified, then the server would only output the 2 specified bands from the image. You specify the bands by selecting or de-selecting the checkbox adjacent to the band. By default, all available bands are selected. You can rearrange the order for the listed bands using the Up and Down buttons.
Use common Geometry – When this option is selected, the settings from the Common options for geometry are applied. Unchecking Use common geometry allows you to define different geometry options for each coverage on the list individually. The possible geometry options (selectable from the drop-down list) are as follows:
Additionally, for methods Draw on the map and Select feature from the map, the buffer can be set. When defining a buffer, two parameters must be provided: buffer unit, which is selected from the Unit drop-down list, and buffer value, which is set in the Value field. If you have selected the point geometry type for drawing the CZS geometry, you may choose to define either a Circle or Square buffer around the selected point. The Value field defines a radius for a circle buffer or a width/height value for a square buffer, For example, a buffer value of 2km for a selected point location will result in either a 4km diameter circle or a 2x2km square, depending on the buffer type selected. Having provided the buffer Unit and buffer Value parameters, click OK (in the buffer option group) to apply settings for defining the buffer.
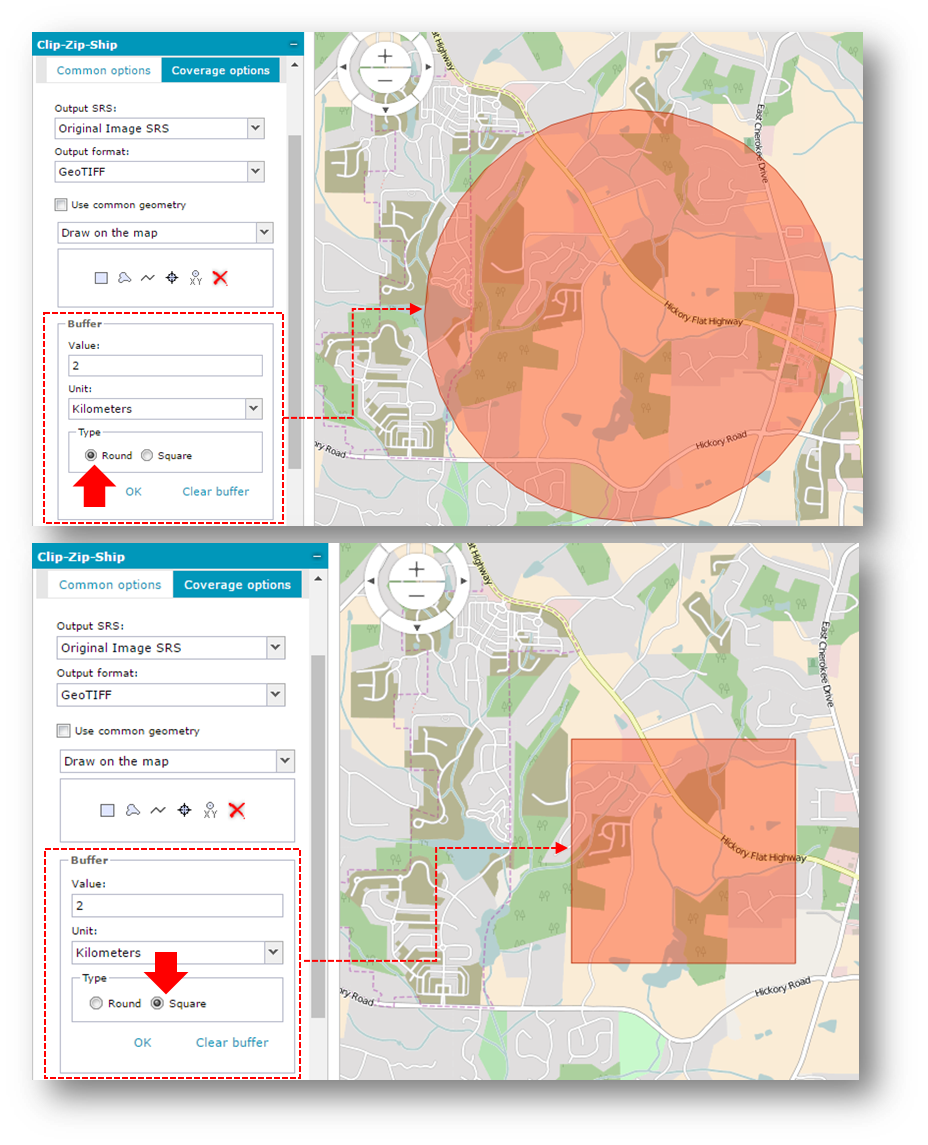
The Clear buffer button removes the defined buffer from the map. The buffer cannot be applied when the Only in visible map area option is selected.
Submit
After you have set up all of the coverage download options, click Submit. You will receive a confirmation email as soon as the server receives your request. Geospatial Portal will then process your coverages according to the options you specified and will place them in a zip file. Each time an incorrectness for geometry is found, an appropriate message with warnings appears. To turn off these warnings, check the Ignore warnings check box.
You will receive a notification email when the server completes your request. The notification email contains a hyperlink to the location of the zip file.
![]() The Clip-Zip-Ship tab is accessible only in the apollo.aspx or apollopro.aspx layout.
The Clip-Zip-Ship tab is accessible only in the apollo.aspx or apollopro.aspx layout.